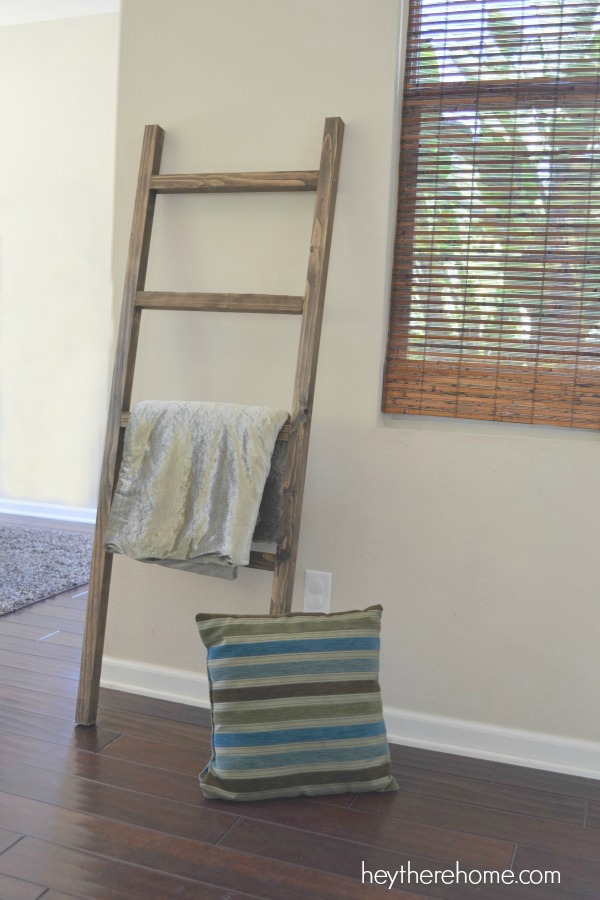
How to Make Blanket Ladders for Rustic and Modern Spaces
Blanket ladders offer a charming and practical solution for organizing and displaying throws, quilts, and other cozy textiles. They add a touch of rustic charm to any space, seamlessly blending into both modern and traditional aesthetics. This guide will walk you through the step-by-step process of constructing a blanket ladder, equipping you with the knowledge and skills to craft a personalized and functional piece for your home.
Choosing Materials and Tools
The first step in constructing a blanket ladder is selecting the right materials and tools. The choice of materials will greatly influence the final look and feel of the ladder, while the tools ensure a smooth and successful construction process.
Materials
- Wood: Opt for sturdy wood like pine, oak, or cedar. The thickness of the wood will impact the sturdiness and overall aesthetic. Consider using 1x2 or 1x3 lumber for the rungs and 1x4 or 1x6 lumber for the sides.
- Screws: Choose wood screws that are long enough to securely fasten the rungs to the sides. Wood glue can be used for added stability and to prevent loosening over time.
- Stain or Paint: Select a stain or paint that complements the existing decor of your space. Consider using a natural stain to enhance the wood grain or a bright paint to create a bold statement.
- Hardware: If you want to add a decorative touch or enhance the ladder's functionality, consider incorporating hooks, brackets, or shelves. These elements can be used for hanging other items besides blankets.
Tools
- Measuring Tape: Accurate measurements are crucial for creating a well-proportioned and balanced ladder. Use a measuring tape to determine the desired height and width of the ladder.
- Saw: Choose a saw that is suitable for cutting the wood to your specified measurements. A hand saw, circular saw, or miter saw are all viable options.
- Drill: A drill is essential for creating pilot holes before inserting screws, ensuring cleaner and stronger joints. Use a drill bit that is slightly smaller than the diameter of the screws.
- Screwdriver: A screwdriver or drill with a screwdriver bit is needed to securely fasten the screws. Consider using a magnetic bit for easier handling.
- Sandpaper: Sanding the wood before staining or painting helps achieve a smooth finish and creates a better surface for the coating to adhere to.
- Level: Ensuring that the ladder is perfectly level is crucial for stability and aesthetics. Use a level to verify that each rung is positioned horizontally and the sides are vertical.
Step-by-Step Construction Guide
Now that you have gathered the necessary materials and tools, follow these step-by-step instructions to construct your blanket ladder:
1. Cut the Wood
- Measure and cut the two side pieces of the ladder to the desired height. Ensure that both pieces are the same length.
- Measure and cut the rungs to the desired width. It's recommended to have at least four rungs for a stable and functional ladder.
- Use a level to ensure that the cuts are precise and the wood is straight.
2. Sand the Wood
- Sand all the wood surfaces, including the sides and rungs, to achieve a smooth and consistent finish. This step helps to remove any rough edges or splinters and creates a better surface for staining or painting.
- Use sandpaper with varying grits, starting with a coarser grit for rough sanding and finishing with a finer grit for a smooth finish.
3. Stain or Paint the Wood
- Apply a stain or paint to the wood surfaces, following the manufacturer's instructions. Allow the coating to dry completely before proceeding to the next step.
- Multiple coats may be necessary to achieve the desired color and opacity. Ensure that each coat is completely dry before applying the next one.
4. Assemble the Ladder
- Position the two side pieces vertically, parallel to each other, and at the desired distance apart. You can use a level to ensure that they are perfectly aligned. The distance between the sides determines the depth of the ladder.
- Using a pencil, mark the positions for the rungs on the sides. Ensure that the rungs are spaced evenly and at a comfortable height for accessing blankets.
- Pre-drill pilot holes at the marked positions on the sides, using a drill bit slightly smaller than the diameter of the screws. This step prevents the wood from splitting when screws are inserted.
- Attach the rungs to the sides using screws and wood glue. Ensure that the rungs are securely fastened to the sides for stability.
- Use a level to ensure that each rung is perfectly horizontal and the sides are vertical. Adjust the rungs as needed to achieve a balanced and level ladder.
5. Add Optional Hardware
- If desired, install hooks, brackets, or shelves to enhance the ladder's functionality and add a decorative touch.
- Ensure that the hardware is securely attached to the ladder and that it is positioned to avoid interfering with the use of the ladder for blankets.
Finishing Touches and Tips
Once the blanket ladder is assembled, you can add finishing touches to personalize it and make it more appealing.
Tips for Personalization
- Use unique hardware: Incorporate decorative hooks, brackets, or shelves made from different materials like metal, leather, or rope. These additions can add a touch of rustic charm or a modern flair.
- Decorate the rungs: Wrap the rungs with rope, twine, or fabric for a more textured look. You can also create stencils and paint patterns onto the rungs for a personalized touch.
- Add a decorative top: Craft a decorative top for the ladder using wood, metal, or other materials. You can also add a small planter or a shelf to display decorative items.
- Use different stains or paints: Experiment with different wood stains or paints to achieve a unique finish. Consider using a distressed paint technique to create a vintage look or a bold paint color for a contemporary statement.
Tips for Placement
- Place near a seating area: Position the blanket ladder near a sofa, armchair, or bed for easy access to throws and quilts.
- Consider the lighting: Place the ladder in a well-lit area to showcase the blankets and allow for easy viewing of the details.
- Use as a room divider: A blanket ladder can effectively divide a room into distinct zones. Consider placing it strategically to create a separate seating area or a cozy reading nook.
Conclusion
Building a blanket ladder is a fulfilling project that allows you to personalize your home with a functional and stylish piece of furniture. By following these steps, you can craft a charming and practical ladder that will add warmth and character to any room. Remember to choose materials and tools that align with your desired aesthetic and consider incorporating personalized touches to create a truly unique piece.


/intro-_pencil_holder-59639f053df78cdc68bc90ba.jpg)


:max_bytes(150000):strip_icc()/13-2edcda8ade644525bdfff677b4349ba4.jpg)
